| Tools of Indesign |
| |
| Type and Drawing Tools |
| |
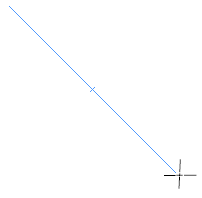
Line Tool: |
| |
| Line tool lets you draw a line segment. |
| |
| To draw a straight line click on Line Tool and press Shift Key. Drag gentally.
You will notice a straight line on the drawing area. |
| |
 |
| |
| The Pen Tool |
| |
 |
| |
| This tool is for drawing lines, curves, and shapes. |
| |
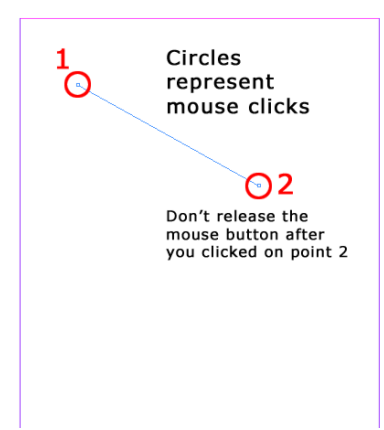
| Drawing Straight Lines with the Pen Tool |
| |
1. Click on the point where the line will start to create the first anchor point.
2. Click on the point the point where the line will end to create the next anchor point. Don’t drag the mouse, just click.
3. Release the mouse. |
| |
| To draw a closed shape using straight lines, repeat steps 1-3 as desired then click on the starting anchor point to close the shape. |
| |
| Drawing Curves with the Pen Tool |
| |
1. Click on the point where the line will start to create your first anchor point.
2. Click on the point the point where the line will end to create the next anchor point. Don’t drag the mouse, just click.
3. Now, drag the mouse. You can drag in any direction to create any curve you want. The more you drag, the bigger your curve will be.
4. Release the mouse. |
| |
| To draw a closed shape using curves, repeat steps 1-3 as desired then click on the starting anchor point to close the shape. |
| |
| Drawing Shapes with the Pen Tool |
| |
 |
| |
| Note this important point when mixing straight lines and curves: After you have created a curve, if you release the mouse button and click somewhere else, InDesign will automatically create another curve. If you don’t want InDesign to create another curve, click on the last anchor point you created. This will remove the handle for that anchor point. Now you can click anywhere and InDesign will make a straight line between those two anchor points. Use this procedure to switch from curves to straight lines within a shape. |
| |
| To close your shape, click on the first anchor point you created when you started drawing with the pen. |
| |
The Pencil Tool |
| |
| You use this tool as if you were using a real pencil and paper. Here are a few things you might want to know while you are using this tool. |
| |
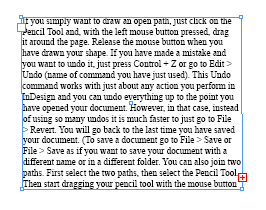
| If you simply want to draw an open path, just click on the Pencil Tool and, with the left mouse button pressed, drag it around the page. Release the mouse button when you have drawn your shape. If you have made a mistake and you want to undo it, just press Control + Z or go to Edit > Undo (name of command you have just used). This Undo command works with just about any action you perform in InDesign and you can undo everything up to the point you have opened your document. However, in that case, instead of using so many undos it is much faster to just go to File > Revert. You will go back to the last time you have saved your document. (To save a document go to File > Save or File > Save as if you want to save your document with a different name or in a different folder.) |
| |
| If you want to draw a closed path, press Alt (Windows) or Option (Mac Os) while you drag your Pencil Tool around and once you release your mouse button, InDesign will close the path you have just drawn. |
| |
| You can also join two paths. First select the two paths, then select the Pencil Tool. Then start dragging your pencil tool with the mouse button pressed from one path to the other. While you do that make sure you hold down Control (Windows) or Command (Mac Os). Once you have finished joining the two paths release the mouse button and the Control or Command key. Now you have one path. |
| |
The Smooth Tool |
| |
| The Smooth Tool makes paths smoother as the name itself says. Paths can bee too jagged and have too many anchor points especially if you have used the Pencil Tool to create them. The Smooth tool often will take away some of these anchor points and will smooth your paths, while keeping their shape as close to the original as possible. You just select your path with the Direct Selection Tool, then you select the Smooth Tool and then drag it along the part of the path you want to smooth out. |
| |
The Erase Tool |
| |
| The Erase Tool allows you to erase parts of paths which you no longer need. You cannot use this tool with text paths, i.e., paths on you which you typed using the Type on a Path Tool. |
| |
| Here is how you use it: First select a path with the Direct Selection Tool, then select the Erase Tool. Now drag your Erase tool, with your mouse button pressed, along the part of the path you want to erase (not across the path). Release the mouse button and you are done! |
| |
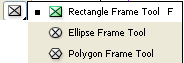
| The Frame Tools Flyout |
| |
 |
| |
| The Frame tool flyout contains rectangle frame tool, Ellipse frame tool and polygon frame tool. By these tools we can create a text placeholder. |
| |
| Here is an example of rectangle frame tool. |
| |
• Click on rectangle frame tool from the toolbox.
• Drag and draw a rectangle.
• Now take a Type Tool (T) and click on rectangle you had drawn.
• You will notice a curser on rectangle.
• Start typing.
• When you type a paragraph beyond the limit of rectangle a red + sign will be shown. It indicates that there is text. |
| |
 |
| + sign indicates more text in the frame. |
| |
| • You should now increase the size of frame by selection. |
| |
Rectangle Tool This tool lets you to create rectangle or square. This tool lets you to create rectangle or square. |
| |
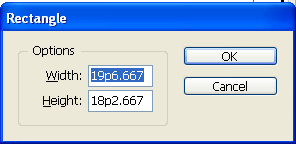
• To draw a rectangle click on rectangle tool and drag on drawing page or working area.
• To draw a rectangle with specific width and height select rectangle tool and click once on drawing page. A window will appear as shown below: |
| |
 |
| |
• Type values in Width and Height boxes.
• Click OK. |
| |
| Note: To draw square Type equal values in Width and Height simultaneously. |
| |
Ellipse Tool (L): This tool is lets you to create circle or oval. This tool is lets you to create circle or oval. |
| |
| To draw circle click on Ellipse Tool and by pressing Shift Key drag on either side in the drawing area. |
| |
| To draw circle click on Ellipse Tool and by pressing Shift Key drag on either side in the drawing area. |
| |
Polygon Tool: This tool lets you to create polygon shape. This tool lets you to create polygon shape. |
| |
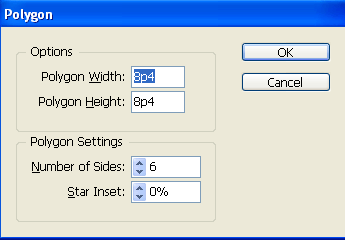
| To draw polygon select Polygon Tool and click on drawing page. A window will appear on the screen. |
| |
 |
| |
• Enter values of width and height of polygon.
• Enter the number of sides required.
• Enter the inset percentage.
• Click OK. |
| |
Type Tool:  This tool lets you create text frames and select text. This tool lets you create text frames and select text. |
| |
| To create text click on Type Tool and drag on drawing area. |
| |
| A curser with inside a box will appear on the screen as shown in figure below. Start typing inside that box area. |
| |
 |
Type on a Path Tool: Type on a Path tool lets you create and edit type on paths. Type on a Path tool lets you create and edit type on paths. |
| |
| An example given to explain Type on a Path Tool. |
| |
Select Pen Tool  and create any curved path. and create any curved path. |
| |
 |
| |
| Select Type on a Path Tool and click on the curved path drawn. A curser will appear on that path. Type on that path. |
| |
 |
| |
|
| |