| Working with various Objects & Shapes |
| |
| Working with Curves |
| |
| In this tutorial you will be able to learn how to make objects by making curves. Objects are generally made by making curves with the help of bazier tool and shape tool or by right-clicking the mouse on the object or line where you want curve. |
| |
| As you have seen, you can edit shapes by moving shape nodes, by using the Knife tool, or by erasing with the Eraser tool. To have total control over a shape, however, you need to convert it into a curve. |
| |
| When you select a shape node with the Shape tool, a To Curve button appears on the Property bar. Click on that button to transform your shape into a curve. You can convert all the nodes in a shape to a curve by selecting the shape with the Pick tool and then choosing Arrange | Convert to Curves from the menu bar. |
| |
| Why convert shape nodes to curves? You have seen that when you edit a node in a shape, you also affect other nodes in the shape. That can be handy when you convert a pentagon into a starfish. But what if you want to edit a single node and only have your editing affect that one node? For this, you need to convert the shape into a curve. |
| |
| Curve nodes can also be edited much more powerfully than Shape nodes. Curve nodes can be of different types and can be fine-tuned to create complex shapes, as you will see in the next section of this hour. |
| |
| NODES IN CURVES |
| |
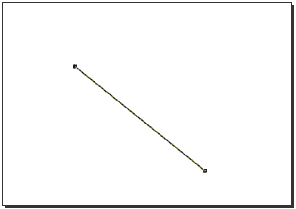
| Nodes are the foundation of any drawing program. Every line, even a simple straight line or curve, contains nodes. Figure below shows a diagonal line with a node at each end. |
| |
 |
| |
| A straight line with a node at each end |
| |
| Shapes drawn with the Rectangle, Ellipse, Polygon, Spiral and Grid tools contain nodes, too. These nodes, though, behave a little differently than nodes in curves. To create various shapes by editing nodes you really need to start with a curve. Fortunately, you can create a curve from any object you create with the various shape tools. The exceptions would be a spiral (which is already a curve) and a grid (which can't be converted to anything else). |
| |
| Between the nodes are what is known as segments. Segments can be either lines (straight segments) or curves (curved segments). Each type can be converted into the other type if need be. |
| |
| There are several different types of nodes and the type of node determines how the associated segments will be shaped and how they will react as you push and pull at the control handles. The control handles are similar to nodes and they are stationed at the end of control lines that are drawn through each node. Normally you won't see the control lines or the control handles; they only become visible when you click on a line, or shape, or select a node with the Shape tool. |
| |
| This isn't true in all cases, though. For example, if you draw a straight line with the Freehand tool as I did to create figure, and select one of the nodes with the Shape tool you won't see any control line or control handles. |
| |
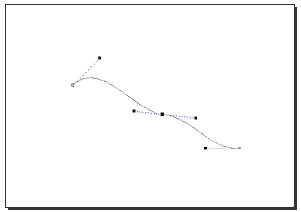
| On the other hand, if you draw a curved line with the Freehand tool (or convert the line to a curve) and then click one end of that line with the Freehand tool, you'll see the control line and the control handles. |
| |
 |
| |
| A curved line with the control line and control handles visible |
| |
| Note that the control lines are one-sided at the ends of the curve (with only one control handle) and that the node in the middle of the line has a two-sided control line with control handles at each end. |
| |
| Clicking and dragging a node with the Shape tool will change the position of the node as well as changing the shape of the curve. Clicking and dragging a control handle will change the shape of the curve without moving the associated node. |
| |
| If you haven't already, fire up CorelDRAW and draw a curve with the Freehand tool. After drawing the curve, select the Shape tool and play around with the nodes. Move the nodes around and then try dragging the control handles. You can move the control handles inwards and outwards from the node they're connected to as well as moving them around the node. Moving a control handle inward as you move it around will decrease the curved-ness of the curve while moving it outwards will accentuate the curve. |
| |
| Note that you can move a selected node using the Arrow keys. You can't move a control handle in this manner, though. |
| |
| Different Types of Nodes |
| |
| There are different types of nodes. These are Cusp, Smooth and Symmetrical. |
| |
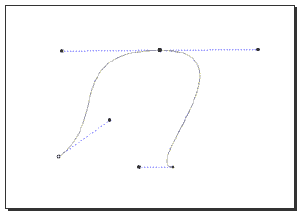
| A symmetrical node has control handles that move in unison. The control lines on each side of a symmetrical node are always the same length. As you move one control handle toward the node, the other handle will move inward as well. This is equally true if you move one of the control handles away from the node. If you move one control handle of a symmetrical node upward, the other handle will move downward and vice-versa. |
| |
| All of the above causes the curve that runs through a symmetrical node to be, well. symmetrical. That is, the curve will be similar on both sides of the node. |
| |
 |
| |
| A curved line with a symmetrical node |
| |
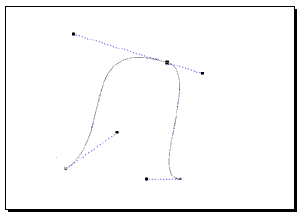
| A smooth node also has a straight control line that runs through it. This control line also has two control handles. However, unlike the symmetrical node, the sides of the control line can be of different lengths. Consequently, the curve, while smooth, will not necessarily be symmetrical. |
| |
 |
| |
| A curved line with a smooth node |
| |
| Cusp nodes are quite interesting. Not only can the control lines be of different lengths, the control handles at each end can move in different directions totally independent from each other. This allows the curve to bend sharply at a cusp node. |
| |
 |
| |
| A curved line with a cusp node |
| |
| The cusp node is just the thing we need to create a heart shape from a curve. |
| |
| Editing Curves |
| |
| Before you can edit curves, you select nodes. Earlier you learned to select nodes using the Shape tool. With the Shape tool selected, you can click on individual nodes to select them. If you hold down Shift while you click, you can select more than one node at a time. |
| |
| You can also select all nodes in an object. This is handy when you want to convert every node in a shape to a curve. |
| |
| Converting Object Nodes to Curves |
| |
| 1. Select the shape using the Shape tool (not the Pick tool). |
| |
| 2. Draw a marquee around the shape using the Shape tool. |
| |
| 3. Click on To Curve button in the Property bar |
 |
|
| |
 |
| |
| Note: If you created your object as a shape, you don't have to convert it to a curve; the nodes are already all set to edit. |
| |
| Add and Delete Nodes |
| |
| When you select an object with the Shape tool, you can add nodes by clicking anywhere on the shape and then clicking on the + (plus) symbol in the Property bar. You can delete nodes by clicking on a node and then clicking on the - (minus) symbol in the Property bar. |
| |
| You can delete extraneous nodes in a curve (ones that don't contribute anything to the curve's shape) by selecting all nodes in the curve and clicking on the Auto-Reduce button in the Property bar. |
| |
| After you learn to edit individual nodes, you'll appreciate the usefulness of getting rid of unnecessary nodes that clutter up your drawing. In Figure below you can see a star is converted to a curve, and use of Auto-Delete to get ride of unneeded nodes |
| |
| |
|
| |