| ICON | SETTING | ICON | SETTING |
| Endpoint | Perpendicular | ||
| Midpoint | Tangent | ||
| Center | Nearest | ||
| Node | Apparent Intersection | ||
| Quadrant | Parallel | ||
| Intersection | None | ||
| Extension | Osnap Setting | ||
| Insertion Point | Temporary Tracking Point | ||
| Snap From | |||
Midpoint - snaps to the exact middle of a line or an arc - MID
Center - snaps to the center-point of a circle or arc - CEN
Node - snaps to 'nodes' (not covered in this course) - NOD
Quadrant - snaps to any of the four quadrants of a circle - QUA
Intersection - snaps to the point where two object cross - INT
Extension - Snaps to the phantom extension of an arc or line - EXT
Insertion - snaps to the insertion point of an object (such as a block or text) - INS
Perpendicular - will snap so that the result is perpendicular to line selected - PER
Tangent - snaps to create a line tangent to a circle or arc - TAN
Nearest - will find the closest point an object and snap to that point - NEA
Parallel -Snaps parallel to a specified line - PAR
None - temporarily turns off all Osnaps. (Pressing your F3 Key is quicker) - NON
Osnap settings - opens the Osnap dialog box.
Temporary Tracking - Creates a temporary tracking point (see Object Tracking).
From - Allows you to select a point, then denote a new location 'from' that point using relative co-ordinates. This can save you the time of drawing (and erasing) construction lines.
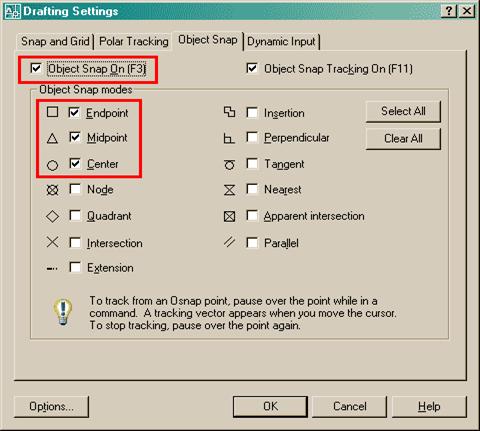
b. Begin the LINE command. Move your cursor around the screen and you'll see that as you get close to an object, it will 'snap' to one of the points that you had checked off in the dialog box. Place your cursor on the circle (not the middle of the circle) until you see a small purple circle appear at its center. Left-click to make this the start point of the line. Move the cursor towards the middle of the vertical line until you see a small triangle appear. (Remember this is the symbol for 'midpoint'). When you see it left-click to accept this as your endpoint. Press <ENTER> to end the line command.
c. Save your drawing.
d. Print your drawing