| Printer |
| |
| Installing a Printer |
| |
As we have already seen in the unit before, it is very easy to install new hardware, such as printers, since the majority use Plug & Play technology. This allows the operating system to recognize the new printer by simply plugging it in.
Nevertheless, in some cases we may need to do the process manually. When we plug a printer into our computer it is necessary to install the appropriate drivers so that our computer will recognize it. |
 |
|
| |
| Next we will learn to install a printer manually and to customize it to our needs. |
| |
| 1. Open the Start menu. |
| |
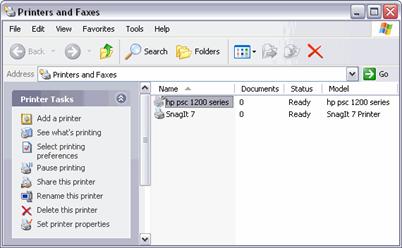
| 2. Select the Printers and Faxes option. |
| |
 |
| |
| |
| 3. If you do not have the option Printers and faxes on your Start menu, you can also reach it through the Control Panel, and then Printers and other hardware. |
| |
| A screen like this one will appear |
| |
 |
| |
| A screen like this one will appear |
| |
If you select a printer on the contextual panel to the right, it will show you some other options
You will see there: Add a printer, See what is printing, Select printing preferences, etc. |
| |
| These tasks are the ones that are usually needed to handle a printer. |
| |
| Now, click on the icon Add a printer to launch the assistant that will help you install a printer. |
| |
| The assistant will be asking you questions such as if your printer is connected directly to your computer or if it is on the web, to which port it is connected to, and then a screen like the one shown below will be displayed so that you can choose the manufacturer and the type of printer so that Windows can install the appropriate software. |
| |
 |
| |
| |
 |
| |
| Click on See basic information about your computer. |
| |
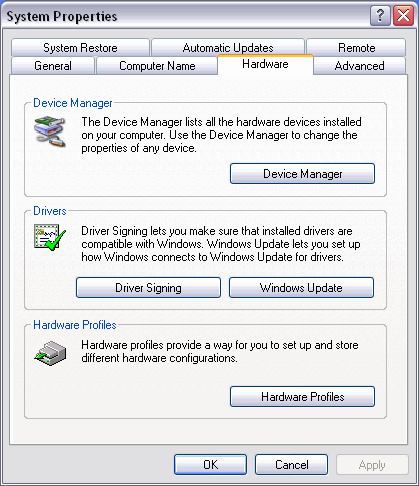
| The System properties window will appear with the General tab selected. On this tab we can see generic information about our system, such as what processor is installed, etc |
| |
| Click on Hardware Tab to view this screen. |
| |
 |
| |
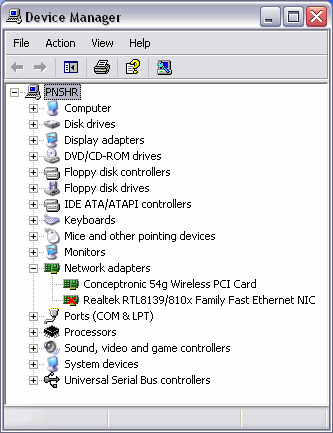
| Now click on Device manager. |
| |
 |
| |
| |
| On this screen the Device manager shows us a list with all of the hardware installed on our computer. |
| |
| This list contains the hardware by type. For example, in Screen adaptors we have information on the graphics card, in Network adaptors we will find information on the network cards installed. |
| |
| Hint: To see the content of each type click on the + on the left. |
| |
| For example: we have opened the content of Network adapters hardware and it shows us two network cards, one of them do no work correctly. |
| |
| The most interesting thing about this list is that it shows us the state of each piece of hardware. |
| |
| If there were an error with any hardware, a yellow question mark would appear to the right of it or a red cross as you can see. |
| |
| |
|
| |
| |