| Programming |
| |
| MySQL with PHP |
| |
| The basic function of PHP is to interpret a script to produce a Web page that is sent to a client. The script typically contains a mix of HTML and executable code. The HTML is sent literally to the client, whereas the PHP code is executed and replaced by whatever output it produces. Consequently, the client never sees the code; it sees only the resulting HTML page |
| |
| Establishing a Connection |
| |
| To create a connection, one usually uses the PHP function mysql_connect, to which three parameters are passed: the computer name (host name) of the MySQL server, the MySQL user name, and the password. If MySQL is running on the same computer as the PHP script (that is, on localhost), then the computer name does not have to be given: |
| |
| $connId = mysql_connect("localhost", "username", "xxx"); |
| |
| This function returns an identification number for the connection. This number will be needed in the future only if you have more than one connection to MySQL open. (As long as there is only one connection to MySQL, this is the default connection. The ID number thus does not have to be given in calling various mysql_xxx functions.) |
| |
| Optional Parameters |
| |
| Beginning with PHP 4.1, you can specify with a fourth parameter whether in multiple execution of mysql_connect with the same connection data, simply a link to the existing connection should be passed (false, default behavior) or a new connection should be established (true). The form mysql_connect($host, $name, $pw, true) is required if you maintain several separate connections. |
| |
| Beginning with PHP 4.2, you can pass client flags in a fifth parameter. A possible constant is MYSQL_CLIENT_COMPRESS (if the data exchange is to take place in compressed form): |
| |
$connId = mysql_connect("localhost", "username", "xxx",
new_link, client_flags); |
| |
| Problems with Establishing the Connection |
| |
| If problems occur in establishing the connection, the variable connId will contain the value FALSE. Moreover, mysql_connect sends an error message to the web server, so that in the resulting HTML document a rather unattractive error message appears for you to behold. To avoid this error message it is necessary to place the @ character before mysql_connect. (In general, this character prevents error messages from being displayed in calls to PHP functions.) |
| |
| If you would like to supply the PHP code for the connection with a readable error message, you might write code something like the following: |
| |
$connId = @mysql_connect("localhost", "username", "xxx");
if ($connID == FALSE) {
  echo "<p><b>I regret to inform you that a connection to the database
    cannot be established at this time.
    Please try again later. Perhaps you will have better luck.</b></p> \n";
  echo "</body></html>\n"; // close HTML Document!
  exit(); // end PHP Script
}
|
|
|
| |
| Selecting the Default Database |
| |
| As soon as a connection is established, you can use various mysql_xxx functions to execute SQL commands and do a lot of other neat stuff as well. To avoid having to specify the desired database over and over, you can use mysql_select_db to select the default database (mysql_select_db corresponds to the SQL command USE databasename): |
| |
| mysql_select_db("sampledb"); |
| |
| Specifying the MySQL user Name and Password in an Include File |
| |
| You should always avoid storing a user name and password in plain text in a file that is accessible over the web. Of course, visitors to your site should in principle never obtain a glimpse of the source text of PHP files, since the PHP code is evaluated by the web server and is no longer visible in the resulting HTML document. But configuration errors have been known to occur by which the PHP file in raw form is revealed to a web surfer. |
| |
| An additional security risk is that the file might be read not via HTTP but via anonymous FTP. (That would also be the result of a configuration error. The directory for anonymous FTP should be completely separate from that with HTML files. Yet such configuration errors occur rather frequently.) |
| |
| Thus to avoid allowing strangers to tumble onto your MySQL password too easily (but also so as not to have to write this information in every PHP script, which would entail a great deal of work if the MySQL password were to change), the MySQL login information is usually stored in its own file. For the examples of this section the password file has the name mylibraryconnect.inc.php, and it looks like this: |
| |
<?php
  // file general/sampledbconnect.inc.php
   $mysqluser="xyz";        // user name for MySQL access
   $mysqlpasswd="xxx";       // password
   $mysqlhost="localhost";   // name of the computer on which MySQL is running
?>
|
| |
Caution
Be absolutely certain that the include file cannot be accessed by anonymous FTP.
Be sure as well that all include files end with *.php. Thus do not use, say, name.inc, but name.inc.php. This ensures that the file will be executed by the PHP interpreter during an HTTP access in every case (for example, if an attacker guesses the .htaccess user name and associated password).
Be sure that it is impossible via anonymous FTP to display a PHP file on your web server in such a way that this file can then be read over the web server. If there is an FTP directory called incoming, then this directory must also not be accessible over the web server (for example, as http://www.mysite.com/ftp/incoming). If that were the case, then an attacker could write a simple PHP script that reads your include file and reads out the contents of the variables. |
| |
| We return now to the PHP file in which the connection to MySQL is to be established. There an include must be used to load the file with the password information. If you assume, for example, that the files intro.php and mylibrary-connect.inc.php are located in the directories |
| |
| /www/education/htdocs/examples/general/examples.php
/www/education/htdocs/_private/sampledbconnect.inc.php |
| |
| then the include instruction in intro.php must look as follows: |
| |
// file intro.php
include("../../_private/ sampledbconnect.inc.php ");
$connID = @mysql_connect($mysqlhost, $mysqluser, $mysqlpasswd);
|
| |
| Depending on how the directories containing the PHP scripts and the include file are located relative to each other, you will have to change the path information in the include command. The two periods (..) indicate that a subdirectory of the current directory is to be used. |
| |
| Building the Connection in the Include File |
| |
| If an include file is used, then one should make full use of its advantages. If you wish to create a connection to MySQL from several different PHP files, it makes sense to store all of the code for creating the connection together with error checking in the include file. |
| |
| The following model assumes that the function mylibrary_connect is executed before any HTML headers or the like are created in the PHP script file. Of course, other ways of proceeding are possible, but take care that the resulting HTML document is complete (that is, inclusive of HTML header and with closure of all open HTML tags): |
| |
<?php
// file general/mylibrary-connect.inc.php
function  connect_to_mylibrary() {
  $mysqluser="abc"; // user name
  $mysqlpasswd="xxx"; // password
  $mysqlhost="localhost"; // name of the computer of which MySQL is running
  $connID = @mysql_connect($mysqlhost, $mysqluser, $mysqlpasswd);
  if ($connID) {
    mysql_select_db("sampledb"); // set default database
    return $connID;
  }
  else {
    echo "<!DOCTYPE HTML PUBLIC \"-//W3C//DTD HTML 4.0//EN\">
       <html><head>
       <title>Sorry, no connection . . . </title>
       <body><p>Sorry, no connection to database  . . .    </p>
      </head></html>\n";
    exit(); // terminate PHP interpreter
    }
  }
?>
|
| |
| Example: |
| |
| The sample program given below demonstrates how you retrieve data into your PHP Web application from a MySQL table. Sample below shows how you can perform custom actions depending upon the query results. |
| |
| Source code for connection.php |
| |
<?php
$host="localhost:3306";		    # host name or ip address
$user="abc";			    # database user name
$pass="sa";            		    # database password
$database="sampledb";
   # dateabase name with which you want to connect
$dblink=mysql_connect($host,$user,$pass);
mysql_select_db($database,$dblink);
?>
|
| |
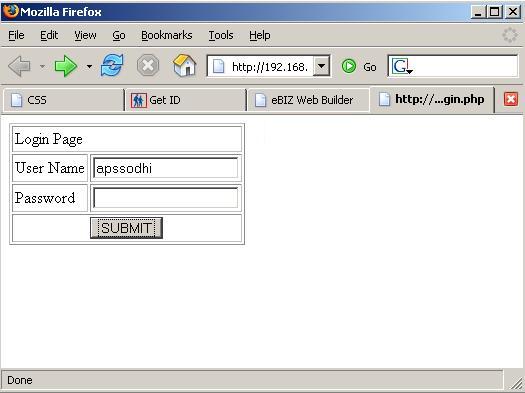
| Source code for test_login.php |
| |
|
<html>
<head>
<title></title>
</head>
<body>
<form name="frm" method="post" action="testlogin_process.php">
<table border="1" cellpadding="2" cellspacing="2" valign="center">
<tr>   <td colspan="2" align="left">Login Page</td>
     </tr>
<tr>
   	   <td>User Name</td>
	     <td><input type="text" name="uname"></td>
	       </tr>
	        <tr>
		  <td>Password</td>
	            <td><input type="password" name="password"></td>
		      </tr>
		     <tr>
		       <td colspan="2" align="center"><input type="submit
" name="submit" value="SUBMIT"></td>
		         </tr>
	           </table>
             </body>
		 </form>
	   </html>
|
| |
| Source code for testlogin_process.php |
| |
<?php
include("connection.php");
$uname=$_REQUEST[uname];
$password=$_REQUEST[password];
$select="select * from login where
u_name='$uname' and password='$password'";
$result=@mysql_query($select);
$arr=mysql_fetch_array($result);
$numrow=@mysql_num_rows($result);
if($numrow==1)
{
	echo "Login Successful";
}
if($numrow==0)
{
	echo "Login Failed";
}
?>
|
| |
| Output : |
| |
| Login Page- |
| |
 |
| |
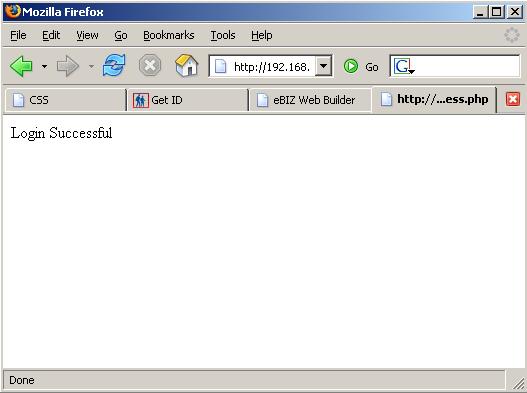
| Message if logged-in successfully:- |
| |
 |
| |
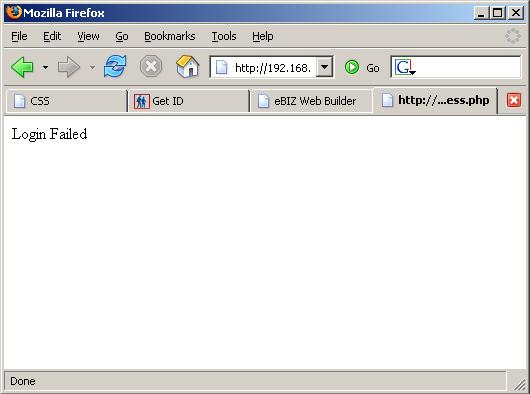
| Login failure message:- |
| |
 |
| |
| |
| |
| |
| |


