• Use the Selection tool
• Use the Direct Selection tool
• Select Type tool and click inside any empty frame.
2. Choose Object > Text Frame Options.
• (Optional) Select Fixed Column Width to maintain column width when you resize the frame. If this option is selected, resizing the frame can change the number of columns, but not their width.
• Choose Edit > Find/Change, and then click the Text tab.
• Specify the range of your search from the Search menu, and click icons to include locked layers, master pages, footnotes, and other items in the search.
• Type or paste the text you want to find.
• To search for or replace tabs, spaces, or other special characters, select a representative character (metacharacter) from the pop up menu to the right of the Find What box. You can also choose wildcard options such as Any Digit or Any Character.

• Select the character style name from the drop-down list in the Control panel.
• Press the keyboard shortcut you assigned to the style. (Make sure that Num Lock is on.)
Do one of the following:
• Select the paragraph style name from the menu in the Control panel.
• Press the keyboard shortcut you assigned to the style. (Make sure that Num Lock is on.)

2. Do one of the following:
- • To apply the drop cap to a single paragraph, choose Drop Caps and Nested Styles from the Paragraph panel menu.
• To nest the character style in a paragraph style, double-click the paragraph style, and then click Drop Caps and Nested Styles.
4. If the drop cap is aligned too far away from the left edge, select Align Left Edge.
- Selecting this option uses the original left side bearing of the drop-cap character rather than the larger value. It’s particularly useful for drop caps formatted in sans serif fonts.
6. Click OK.
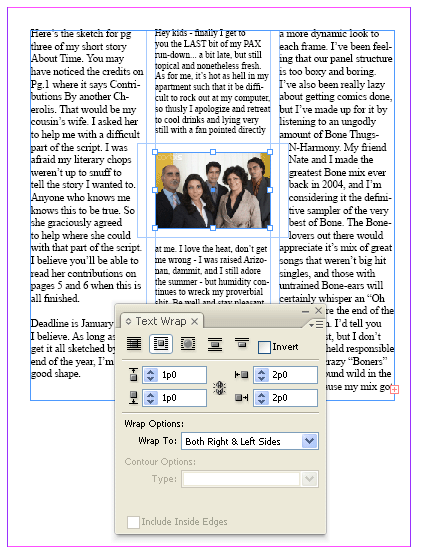
1. Choose Window > Text Wrap.
2. Click on Selection tool or Direct Selection tool , and select the object to wrap text around.
3. In Text Wrap panel, select the desired wrap.
• Jump Object
• Keeps text from appearing in any available space to the right or left of the frame.
• Jump To Next Column
• Forces the surrounding paragraph to the top of the next column or text frame.
4. From the Wrap To menu, specify whether the wrap is applied to a specific side (such as the right side or largest area) or towards or away from the spine. (If you don’t see the Wrap To menu, choose Show Options from the Text Wrap panel menu.)
This option is available only if you selected Wrap Around Bounding Box or Wrap Around Object Shape.
5. Specify offset values. Positive values move the wrap away from the frame; negative values move the wrap within the frame.
2. Click to place an insertion point, or select the text that you want to format.
3. In the Control panel, click the Character Formatting Control icon or the Paragraph Formatting Control icon.

2. Select a font in the Font Family menu or a style in the Type Style menu or choose a font in the Type > Font menu.
To change leading of any text
- • Select the text.
• Go to Character panel or Control panel and choose the desired leading from the Leading menu .
Tracking is loosening or tightening a block of text.
- • Select text.
• Go to character panel or control panel and select Metrics in the Kerning
- • Select text with Type Tool.
• Press Alt+Ctrl+\ and drag with mouse to increase space between words.
• Press Alt+Ctrl+Backspace and drag with mouse to decrease space between words.
- Select text.
In the Character panel type or select a numeric value for Tracking
• Do any of the following:
- • Click the Bulleted List button
• Choose Bullets And Numbering from the Paragraph panel or Command panel. For List Type, choose either Bullets or Numbers. Specify the settings you want, and then click OK.
• Apply a paragraph style that includes bullets or numbering.
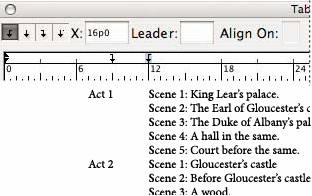
2. Press the Tab key. Add tabs in the paragraphs where you want to add horizontal space. (You can also add tabs after you create your tab settings.)
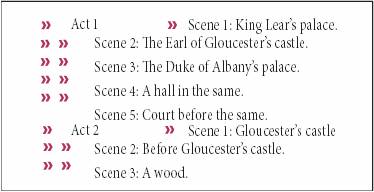
4. For the first tab, click a tab-alignment button (left, right, center, or decimal) in the Tabs dialog box to specify how text will align to the tab’s position.
5. Do one of the following:
- • Click a location on the tab ruler to position a new tab.
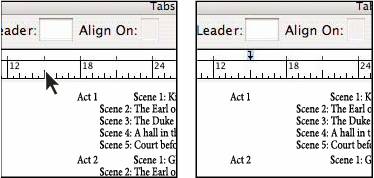
-
• Type a position in the X box and press Enter or Return. If the X value is selected, press the up or down arrow key to increase or decrease the tab value by 1 point, respectively.