| Importing & Exporting of Object |
| |
| Exporting |
| |
| Exporting is saving a copy of your file or object to a particular format to be used by other programs. For example: if you create a logo in CorelDraw, but you would like that logo for use in your Web site, you will have to export to a format that Web browsers can read (GIF or JPG). Your original CorelDraw file cannot be read on the Web. Exporting does not affect your working document in any way. CorelDraw exports to any graphic file type most people will ever need. |
| |
| You can export any portion of your document as many different types of files. You can export one object, or the whole page. A complete description of what file types available and which attributes can be exported is well outside the scope of this tutorial. In fact, that topic could easily fill an entire book. The important thing to remember though, is that exporting is like translating languages. You are taking CorelDraw language and converting it to a language other programs can understand. When you export, it is important to know where the image will be used. |
| |
| You can export your drawing and text from coreldraw to other applications like Adobe Photoshop, Illustrator, Macromedia Flash, Ms Word etc. For exporting in other application you should mention save file type extension. For example if you are exporting any image of coreldraw to illustrator you should give AI extension after the file name. |
| |
| Export: is for exporting file to other formats that can be used to other applications like Adobe illustrator (AI) or GIF format etc. |
| |
| For Exporting any file |
| |
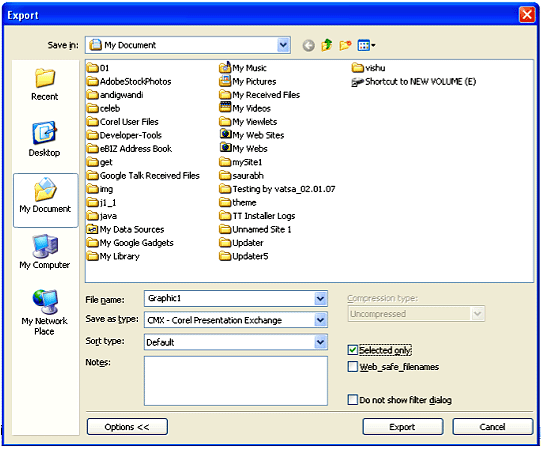
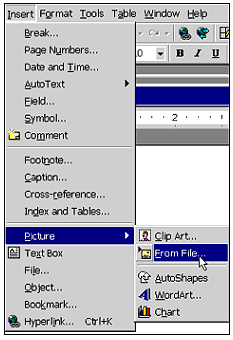
| . Go to File Menu and Click on Export. |
| |
| . A dialog box will appear on the screen as shown below. |
| |
 |
| |
| . Choose the folder where you want to save the file. |
| |
| . Type the file name in the filename list box. |
| |
| . Select the file type format in which you want to save the file ie. PSD, PDF OR EPS format. |
| |
| . Click Options. |
| |
| . If you are saving only selected objects than enable Selected Only check box. |
| |
| . If you are exporting only a single page from the document, enable Export this page only check box. |
| |
| . Click Export. |
| |
| Note: |
| |
| . For exporting any transparent image to photoshop you should export it in EPS format from coreldraw. |
| |
| . If you are exporting any image as background you should export it in JPEG format. |
| |
| . If you are exporting any image to flash you should save it in SWF file format. |
| |
| . If you are exporting any image for web purpose you should save it in GIF or JPEG format in 72 resolution only. |
| |
| Export for Office: You can export a file so that it is optimized for use with office productivity applications such as Microsoft Word or WordPerfect. |
| |
| For exporting a file to microsoft office or WordPerfect Office |
| |
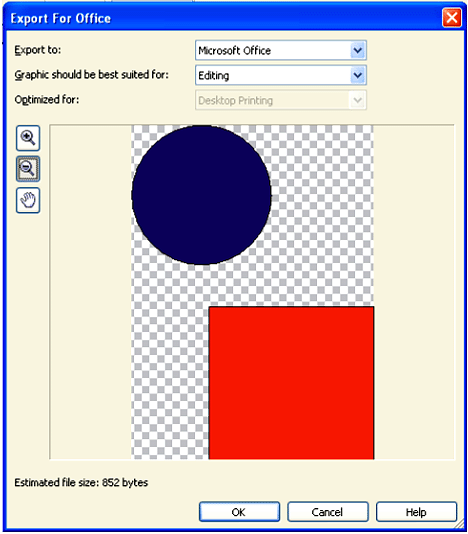
| . Go to File Menu and Click on Export for Office. |
| |
| . A Dialog Box will appear on the screen as shown below. |
| |
 |
| |
| . From Export to List Box, choose the following: |
| |
| . Microsoft Office - lets you set options to meet the different output requirements of Microsoft Office applications |
| |
| . WordPerfect Office - automatically optimizes the image for WordPerfect Office by converting it to a WordPerfect Graphics file (WPG) |
| |
| . From the Graphic should be best suited for list box, choose one of the following: |
| |
| . Compatibility - lets you save the drawing as a bitmap in the Portable Network Graphic (PNG) file format. This preserves the appearance of the drawing when you import it into an office application. |
| |
| . Editing - lets you retain most of the editable elements in vector drawings by saving the drawing in the Extended Metafile Format (EMF). |
| |
| . From the Optimized for list box, choose one of the following options: Presentation - lets you optimize the file for outputs such as slide shows or online documents (96 dpi) |
| |
| . Desktop printing - lets you maintain good image quality for desktop printing (150 dpi) |
| |
| . Commercial printing - lets you optimize the file for high-quality printing (300 dpi) |
| |
| . An estimated file size appears in the lower-left corner of the dialog box. |
| |
| . Click OK. |
| |
| . Locate the folder in which you want to save the file. |
| |
| . Type a filename in the Filename list box. |
| |
| . Click Save. |
| |
| Export drawing to TIF File |
| |
| . Select the items you want to export with the Pick Tool. |
| |
 |
| |
| . Choose File, Export from the Main Menu. Select TIF as the File Type. Choose the name and location for your file. Choose Selected only. Leave Compression Type as Uncompressed. Click Export. |
| |
| Set Size and Resolution |
| |
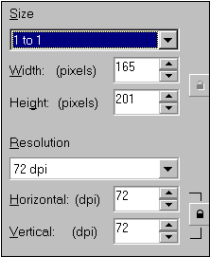
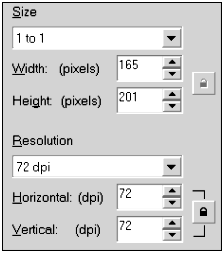
| Choose the size for your file. Size is determined by end use and is not dependent on the original size of the CorelDraw created image. Since CorelDraw is vector based, you can increase or decrease graphic size on export with no quality loss. Choose 1 to 1 or Custom if you need to adjust size. Note: The custom default does not offer proportional sizing. Click on the lock icon beside the size information BEFORE you adjust the size. This locks the proportion. |
| |
 |
| |
| Set Export Attributes |
| |
| With the color selection box, choose RGB color (for quality color) or Grayscale (for B&W photo) or Black and White for a black and white image with no gray shading. If you are going to be using the file only as a black and white image, choose this now, since the file size is significantly lower. |
| |
 |
| |
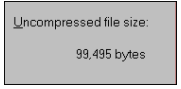
| Check File Size |
| |
| Check your file size as you resize or change modes. Small changes can create dramatic adjustments in file size. When working with bitmap images, file size is always a concern. Try for the smallest size that will give the quality you desire by planning ahead and only including the information that you will use, i.e., saving a larger sized image than you use does not improve quality . it simply bloats the file size. |
| |
 |
| |
| Finish |
| |
| Click OK and your file will be placed in the folder you specified in the Export window. You can now open your new application and import your TIFF. |
| |
| Export to GIF |
| |
| If you are exporting any type of image but a photograph style for the Web, GIF is the best choice. It is one of two common formats that can be used on the Web (JPG is the other). GIF is the only format in common use for the Web that can create transparent backgrounds, a very popular feature. GIF is best when you have large areas of solid color, since the file size will be smaller. GIF images have a maximum of 256 colors, so they are not appropriate for photo type graphics. |
| |
| Export File Basics |
| |
| Select the items you wish to export with the Pick Tool. Choose File, Export from the Main Menu. Select GIF as the File Type. Choose the name and location for your file. Choose Selected only. |
| |
 |
| |
| Set Size and Resolution |
| |
| Choose the size for your file. Size is determined by end use and is not dependent on the original size of the CorelDraw created image. CorelDraw is vector based, so you can resize a graphic on export with no quality loss. Choose 1 to 1 or Custom if you need to adjust size. Note: The Custom size default does not offer proportional sizing. Click on the lock icon beside the size information BEFORE you adjust the size. This locks the proportion. GIF files are usually set for 72 dpi resolution for Web use. |
| |
 |
| |
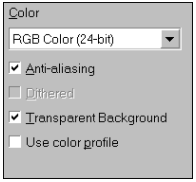
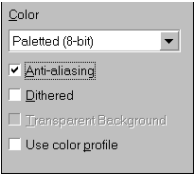
| Set Export Attributes |
| |
| With the color selection box, choose Paletted (8-bit) or Black and White for a black and white image with no gray shading (Grayscale offers no file size reduction for GIF files). If you are going to be using the file only as a black and white image, choose this now, since the file size is significantly lower. Choose Anti-aliasing unless you are exporting small text. Anti-aliasing smooths edges, but with small text (and some detailed small graphics), the result is fuzzy. Normally, dither is not selected. |
| |
 |
| |
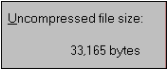
| Check File Size |
| |
| Check your file size as you resize or change modes. Small changes can create dramatic adjustments in file size. When working with bitmap images, file size is always a concern. Try for the smallest size that will give the quality you desire by planning ahead and only including the information that you will use, i.e., saving a larger sized image than you use does not improve quality . it simply bloats the file size, and makes Web download time high. |
| |
 |
| |
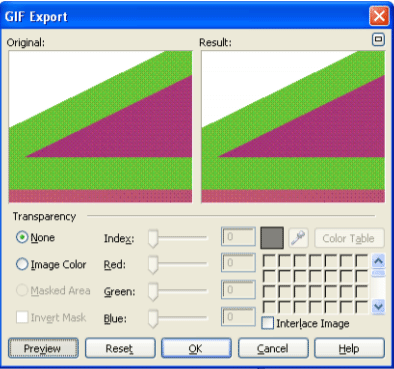
| Set Transparency |
| |
| You can set a color to be transparent with a GIF file. Normally this will be the background. Be careful when creating your graphics, since any areas of the image that are the same color as the background will be transparent. Choose the eyedropper and move it to the left screen containing your image. Click on the background color. That color is highlighted in the color list. Click preview to see results. The checked background indicates transparency. (Choose None for no transparency.) Click OK. |
| |
| |
|
| |