| Working with Text |
| |
| Formatting Text |
| |
| You can change text font for an entire selected text object, or you can format only certain characters in an artistic text object. |
| |
| For formatting text: |
| |
| . Select a text object. |
| |
| . Click on the Text tool; an insertion point cursor appears. You can drag to select part or all your text to apply new formatting. |
| |
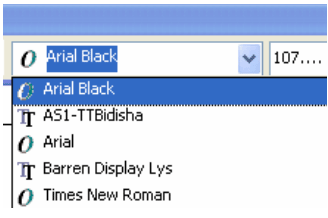
| . After you select the text to which you want to apply formatting, pull down the Font List and select a new font. |
| |
 |
| |
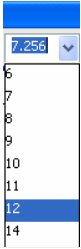
| . You can assign font size in the same way, by choosing a font size from the Font Size List drop-down menu. |
| |
 |
| |
| . You can also resize and reshape selected text objects by dragging the handles. When you drag a handle in toward the center of the object, you make it smaller. When you drag out, away from the center, you make the object larger. This technique works with all selected objects in CorelDRAW and works with artistic text as well. |
| |
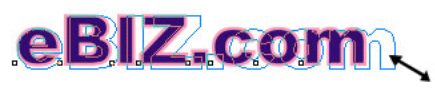
| If you drag a corner handle, as shown in figure below, you maintain the proportion between height and width as you resize your object. |
| |
 |
| |
| If you drag on a side or top handle, you will change not only the size but also the shape (or proportions) of the text, as shown in Figure below: |
| |
 |
| |
| You can add (or remove) boldface, italics, or underlining to text using the Bold, Underline, and Italic buttons in the Text Property bar. These attributes are not available for all fonts because some fonts are designed to be specifically boldface or to have a light face. |
| |
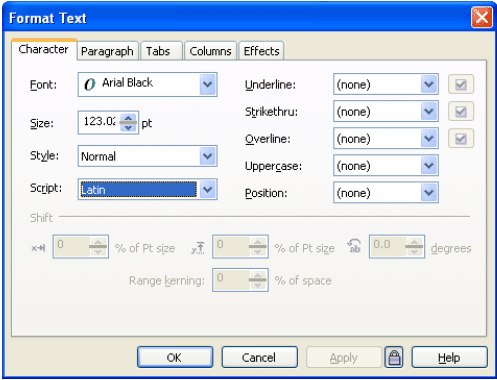
| The Format Text dialog box offers more detailed text formatting features. With your text object selected, click on the Format Text tool in the Property bar or choose Text > Format Text from the menu bar. The Format Text dialog box has three tabs. The Font tab allows you to assign fonts and font sizes, as well as other font attributes such as Strikethrough, Overscore, Uppercase (including small caps). |
| |
 |
| |
| Fig . Format Text Dialog Box |
| |
| There are two other tabs in the Format Text dialog box. The Align tab provides the same options as the alignment buttons in the dialog box toolbar: None, Left, Center, Right, Full Justify (both margins, if you have enough text to look good stretched margin to margin), and Forced Justify. The Space tab enables you to define spacing between characters (letters), words, and lines in your text. You will often use these tabs to tweak paragraph text where you have many lines of text. |
| |
| As you experiment with text formatting, you will see the font previewed in the small window at the bottom of the dialog box. When you are satisfied with the appearance of your text, click on the OK button. |
| |
| Editing and Formatting Text Characters |
| |
| You can edit text by clicking on the Text tool and then clicking in a text object. The vertical bar cursor represents the insertion point. You can press Delete or Backspace to delete text, or you can type new text at the insertion point. Insert point before the word "Zoo," pressed Backspace three times to delete the word "New," and am typing the word "The." |
| |
| For more heavy-duty text editing, you'll find the Edit Text dialog box more helpful. Open this dialog box for a selected text object by clicking on the Edit Text button in the Property bar, or by selecting Text | Edit Text from the CorelDRAW menu bar. |
| |
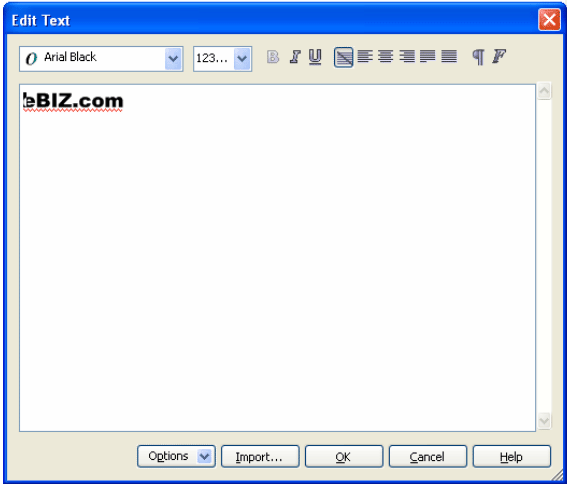
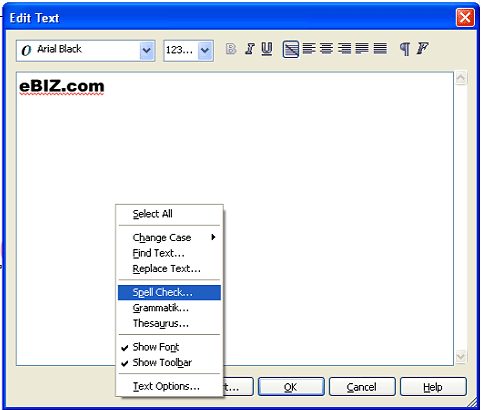
| The Edit Text dialog box is a miniword processor in a window. You can insert or delete text here. And like many of the latest word processors, the Edit Text dialog box will underline words not found in the dictionary with a wavy red line. |
| |
| Just as with the fanciest word processors, you right-click on a potentially misspelled word to see a list of possible correct spellings. |
| |
| Formatting Text Characters |
| |
| So far, you have learned to apply formatting (including size) to entire text objects. You can also apply formatting to selected characters within a selected text object. An easy place to make these changes is the Edit Text dialog box. |
| |
 |
| |
| Editing in the Edit Text dialog box. |
| |
| To apply formatting to selected characters within a text object, select those characters in the Edit Text dialog box, and then apply formatting. |
| |
| Note: The Edit Text dialog box is not fully WYSIWYG (what you see is what you get). You have to click OK and view the results in the CorelDRAW window to see the exact effect of font attributes assigned to selected text. |
| |
 |
| |
| Selected text characters can be formatted in the Edit Text dialog box--my favorite shortcut to get there is Ctrl+Shift+T. |
| |
| If you want more power to assign detailed formatting to selected text, click on the Format Text button in the Edit Text dialog box. Font attributes assigned in this way will apply only to the selected text. When you have edited and assigned formatting to any text, click on OK in the Edit Text dialog box. The results will be visible in the CorelDRAW window. |
| |
| |
|
| |