| Getting Started with AutoCAD |
| |
| Direct Distance Entry |
| |
| As mentioned earlier in the lessons, there are many ways to do things in AutoCAD. To enter distances, you have been shown Absolute, Relative and Polar Co-ordinates. Now you will be shown two more ways to tell AutoCAD where the locate the point you are drawing to. |
| |
|
DO NOT FORGET THE BASICS OF MANUAL ENTRY |
| |
| Direct Distance Entry (or DDE) is a way of bypassing the usual ways of entering in co-ordinates and just entering the distance. |
| |
| The method is quite easy. |
| |
Make sure that you have set Ortho (locking your input to vertical and horizontal) by pressing the F8 button and checking to see that the "Ortho" button is depressed on the status bar like this:  Your F8 key will toggle Ortho on and off. Your F8 key will toggle Ortho on and off. |
| |
| Lets say you want to draw a line from one point directly to the right 10 units. |
| |
| Start the Line command and click on the screen anywhere, then more your cursor to the right of that point. If Ortho is turned on, the line should only point directly to the right and not at an angle. Now type in 10 <ENTER>. Press <ENTER> again to exit the command. You now have line that is 10 units long. |
| |
 |
| |
| That is a very easy way to draw line segments. If Ortho is not set, your drawing will get messed up very quickly and will not be easy to fix. I have seen too many students take this easy route and wreck projects. |
| |
| Now wouldn't it be cool to draw angled lines (like the short ones in the above image)? Well you can, but first you have to make change in your settings. |
| |
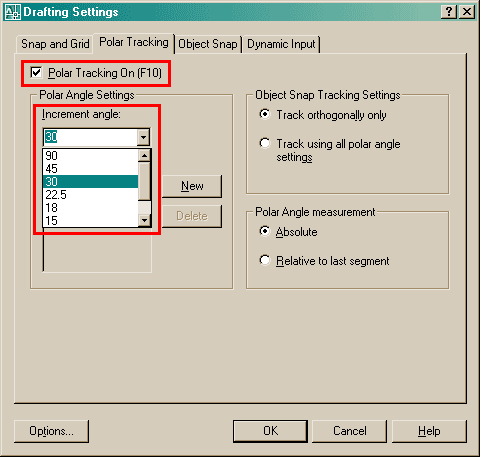
| Type in DSETTINGS and you get the Drafting Settings dialog box, go to the "Polar Tracking" tab. : |
| |
 |
| |
| Then make sure that Polar Tracking is On (press your F10 key to toggle it on and off) and then select the increment angle. |
| |
|
| |