| Deployment and Packaging of ASP.Net Application |
| |
| Creating Web Setup Project Using Visual Studio.NET |
| |
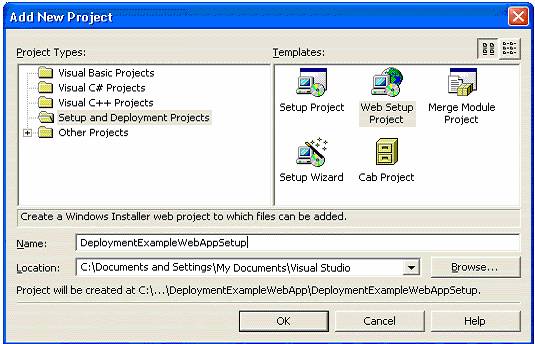
| We will start by adding a new Web Setup Project to our DeploymentExampleWebApp ASP.NET Web application solution by selecting File->Add Project-> New Project from the menu. In the New Project dialog box, select Setup and Deployment Projects from the Project Types pane and then select Web Setup Project in the Templates pane as shown in the following figure. |
| |
 |
| |
| Adding Primary Output and Content Files |
| |
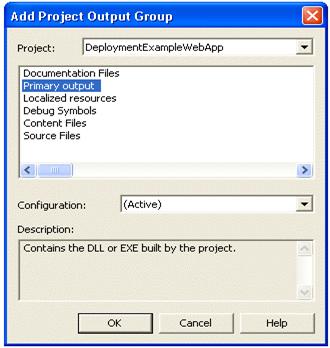
| After creating the project, you then need to add the output of the primary assembly and the content files of the ASP.NET Web application to the setup project. To do this, right click on the DeploymentExampleWebAppSetup project in the solution explorer and select Add->Project Output from the context menu. In the Add Project Output Group dialog box, select DeploymentExampleWebApp from the Project combo box and select Primary Output from the list. |
| |
 |
| |
| After adding the project output, you then need to add the related Content Files (such as .aspx files, Images, and so on) to the project. To do this, again bring up the Add Project Output dialog box and then select Content Files from the list this time. It is illustrated in the following screenshot. |
| |
 |
| |
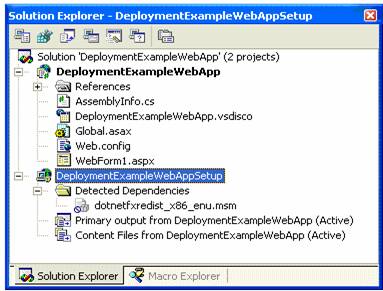
| After adding the Primary output and the Content Files to the Web Setup project, the solution explorer looks as follows: |
| |
 |
| |
| Properties Configuration |
| |
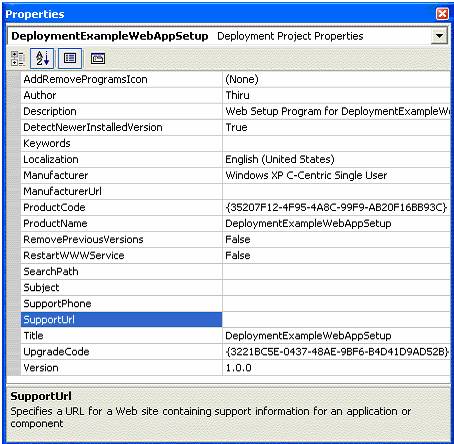
| There are a number of properties that you can set through the properties window of the Web Setup project. These properties determine the runtime display and behavior of the Windows installer file. To accomplish this, right click on the DeploymentExampleWebAppSetup project from the solution explorer and select Properties from the context menu to bring up its properties window. The dialog box shown below appears in the screen. |
| |
 |
| |
| As can be seen from the above screenshot, the properties window provides properties such as Author, Description, Manufacturer, SupportPhone and so on that can be very useful to the users (who are installing your application) of your application to get more details about your application. |
| |
| Installing the ASP.NET Web Application |
| |
| Once you have created the Windows installer file (.msi file), then installing the ASP.NET application in the target servers is very straightforward. All you need to do is to double-click on the .msi file from the Windows explorer. This will initiate the setup wizard, which will walk you through the installation steps. The following screenshot shows the first dialog box displayed during the installation. |
| |
 |
| |
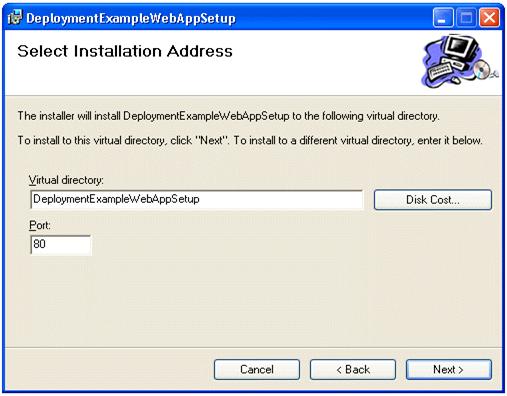
| Clicking on Next in the above dialog box results in the following dialog box, where you can specify the virtual directory that will be used to host this Web application. This is one of the handy features wherein the creation of virtual directory is completely automated obviating the need for manual intervention. In part two of this article, we will see how to set specific properties (such as Directory Security, Default Document and so on) on the virtual directory as part of the installation process. |
| |
 |
| |
| In the above dialog box, you can also click on the Disk Cost... command button to get an idea of the space required for installing this Web application. Clicking on Next in the above dialog box results in the following dialog box where you are asked to confirm the installation. |
| |
 |
| |
| When you click on Next in the above dialog box, the installation will begin and the application will be installed. If the application is successfully installed, you will see the following dialog box. |
| |
 |
| |
| After installing the application, you can see the installed ASP.NET application through the Add/Remove Programs option (that can be accessed through Start->Settings->Control Panel) in your computer. From here, you can run the setup program to uninstall the application any time you want to. |
| |
|
| |