| Deployment and Packaging of ASP.Net Application |
| |
| Deploying Methods in ASP.NET 2.0 |
| |
| You can deploy an ASP.NET Web application using any one of the following three deployment options. |
| |
⢠Using XCOPY Deployment
⢠Using the Copy Project option in Visual Studio.NET
⢠Using Visual Studio.NET Installer |
| |
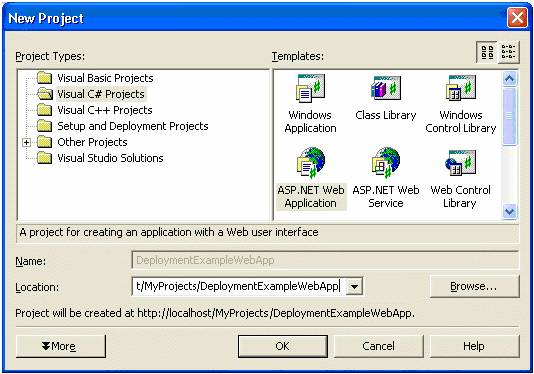
| In the following sections, you will be provided with an in-depth look at all of the deployment options available in .NET. For the purposes of this article, let us create a new Visual C# ASP.NET Web application named DeploymentExampleWebApp as shown in the following screenshot. |
| |
 |
| |
| We will use the above project to show the different ways of deploying a Web application. |
| |
| Using XCOPY Deployment |
| |
| One of the primary goals of the .NET Framework is to simplify deployment by making possible what is known as XCOPY deployment. Before looking at how .NET enables XCOPY deployment, let us take a moment to understand what XCOPY deployment is. Prior to .NET, installing a component (for example, a COM Component) required copying the component to appropriate directories, making appropriate registry entries, and so on. But now in .NET, to install the component all you need to do is copy the assembly into the bin directory of the client application and the application can start using it right away because of the self-describing nature of the assembly. This is possible because compilers in the .NET Framework embed identifiers or meta-data into compiled modules and the CLR uses this information to load the appropriate version of the assemblies. The identifiers contain all the information required to load and run modules, and also to locate all the other modules referenced by the assembly. It is also refered to as zero-impact install since the machine is not impacted by way of configuring the registry entries and configuring the component. This zero-impact install also makes it possible to uninstall a component without impacting the system in any manner. All that is required to complete uninstallation is the removal of specific files from the specific directory. For performing this type of deployment, all you need to do is to go to the Command Prompt and copy over the required files to a specific directory on the server using the XCOPY command. |
| |
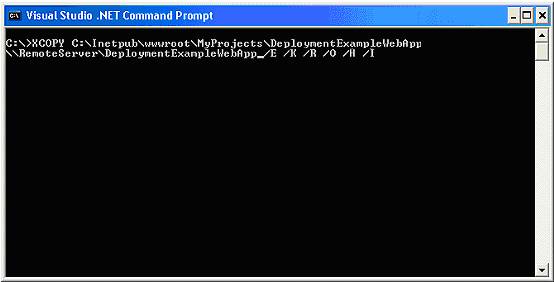
| The following screenshot illustrates the use of XCOPY deployment to deploy the Web application named DeploymentExampleWebApp to the target server named RemoteServer. |
| |
 |
| |
| As you can see, the XCOPY command takes a number of arguments. |
| |
⢠/ E - This option copies directories, subdirectories, and files of the source argument, including empty ones.
⢠/ K - This option allows you to retain all the existing file and folder attributes. When you use XCOPY to copy files or a directory tree structure, XCOPY strips off file attributes by default. For example, if a file had the read-only attribute set, that attribute would be lost after the file is copied. To retain the original attributes with the copied files, you must use the / K parameter.
⢠/ R - This option overwrites files marked as read only.
⢠/ O - This option preserves all security-related permission ACLs of the file and folders.
⢠/ H - This option copies both hidden and system files.
⢠/ I - This option tells XCOPY to assume that the destination is a directory and create it if it does not already exist. |
| |
| Please refer to the MSDN help documentation for more information on the different options supported by XCOPY command. |
| |
| Once the folder is copied over to the target server, you then need to create a virtual directory on the target server (using Internet Information Manager MMC snap-in) and map that virtual directory to the physical directory that is created using the XCOPY command. That's all there is to deploying an ASP.NET Web application on a remote server using XCOPY Deployment. |
| |
| Using the Copy Project Option in Visual Studio .NET |
| |
| The Copy Project option in VS .NET makes it very easy to deploy ASP.NET Web applications onto the target servers. Using this option, you can copy the Web project to the same server or to a different server. |
| |
| If you are using VS .NET to develop Web applicatons, the first thing that you need to do before packaging an ASP.NET Web applications is to change the Active Solution Configuration from Debug to Release as shown below. This allows the compiler not only to optimize the code but also remove the debugging related symbols from the code, making the code run much faster. To bring up the Configuration Manager, select your Web project from the Solution Explorer and select Project->Properties->Configuration Properties from the menu and then click on the Configuration Manager Command button. In the Active Solution Configuration combo box, select the Release option. |
| |
 |
| |
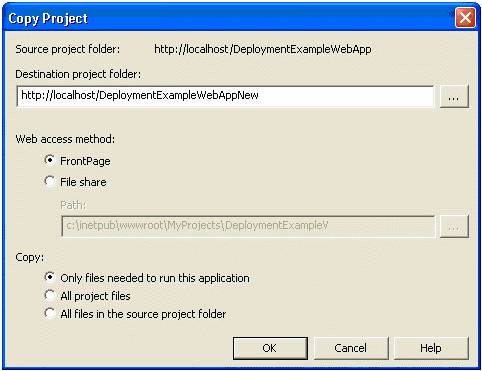
| To copy the Web project onto the target server, select Project->Copy Project from the menu. Selecting that option will result in the following dialog box being displayed. |
| |
 |
| |
| The Copy Project dialog provides the following options. |
| |
⢠Destination Project Folder: Using this option, you can specify the location to which you want to copy the project. The location can be the same server or a remote server.
⢠Web access method: The Web access method option determines the access method that is used to copy the Web project to the destination folder. There are two types of Web access methods. |
| |
⢠File share: This option indicates that you want to directly access your project files on the Web server through a file share. It does not require FrontPage Server Extensions on the server.
⢠FrontPage: This option specifies that you want to use the HTTP-based FrontPage Server Extensions to transfer your project files to the server. Before using this option, make sure FrontPage Server Extensions are installed on the server. This option will automatically create the required virtual directory on the target server. |
| |
| ⢠Copy: The Copy option provides three types: |
| |
⢠Only files needed to run this application: this option copies built output files (DLLs and references from the bin folder) and any content files (such as .aspx, .asmx files). Most of the time, you should be able to deploy the application using this default option.
⢠All project files: this option copies built outputs (DLLs and references from the bin folder) and all files that are in the project. This includes the project file and source files.
⢠All Files in the source project folder: choosing this option will result in all the project files and any other files that are in the project folder (or subfolder) being transferred to the destination folder. |
| |
| To copy the Web project, select the appropriate options from the above Copy Project dialog box and click OK. This will result in the ASP.NET Web application being deployed on the target server. |
| |
| Deployment Using Visual Studio .NET Web Setup Project |
| |
| Even though XCOPY deployment and Copy Project options are very simple and easy-to-use, they do not lend themselves well to all of the deployment needs. For example, if your application requires more robust application setup and deployment requirements, VS .NET installer can be the right choice. Although you can distribute your Web application as a collection of build outputs, installer classes, and database creation scripts, it is often easier to deploy complex solutions with Windows Installer files. VS .NET provides Web setup projects that can be used to deploy Web applications. These Web setup projects differ from standard setup projects in that they install Web applications to a virtual root folder on a Web server rather than in the Program Files folder, as is the case with the applications installed using standard setup projects. |
| |
| Since VS .NET installer is built on top of Windows Installer technology, it also takes advantages of Windows Installer features. Before starting on a discussion of VS .NET Web Setup Project, let us understand the architecture of Windows Installer technology that provides the core foundation on top of which the VS .NET installer is built. |
| |
| The Windows Installer divides applications into the following three levels. |
| |
⢠Product: It is something a user can install. For example, MS Word is a product that a user can install.
⢠Feature: A product is composed of multiple features. A feature is also the smallest unit of functionality of a product. For example, AutoCorrect functionality can be considered a feature of MS Word.
⢠Component: A component can be considered the smallest unit that can be shared across multiple features and components. It is very important to understand that the component in Windows Installer terms is not the same as the term component in the .NET Framework. A Windows installer component can be a single file or multiple files that logically belong together. It can be an executable, a dll, or a simple text file. A collection of components can form together to provide a feature and it is also possible for a component to be shared across multiple features. While features are specific to a product and identified by a name unique only within the product, components are global across all products installed on a machine. For example, the spell checker component of MS Word can be shared across all the applications that want to implement spell-checking feature. |
| |
| Information related to a product such as features, components are described in a centralized repository known as Installation Database. The installation database is nothing but a file with the extension .msi that not only contains information about the features and components of the product but also about the sequence of user interfaces displayed during the installation of the product. Since the Windows installer is registered as a server application for files with a .MSI extension, it is automatically invoked by the shell when an .MSI file is opened by a user. When invoked in this way, the installer reads product information from the installation database file and determines whether the product is already installed. If the product is not yet installed, it launches the product's installation sequence, which is described in the database. If the product is installed, different logic can be invoked, such as to add and remove features or uninstall the product. |
| |
| Features Provided by VS .NET Web Setup Project |
| |
| The deployment project in VS .NET builds on features of the Windows installer by allowing us to perform the following operations. |
| |
⢠Reading or writing of registry keys
⢠Creating directories in the Windows file system on the target servers
⢠Provides a mechanism to register components
⢠Provides a way to gather information from the users during installation
⢠Allows you to set launch conditions, such as checking the user name, computer name, current operating system, software application installed, presence of .NET CLR and so on.
⢠Also makes it possible to run a custom setup program or script after the installation is complete. |
| |
| In the next section, we will see how to deploy our DeploymentExampleWebApp using the VS .NET Web Setup Project. |
| |
|
| |