| Tables |
| Â |
| Table in Design View |
| Â |
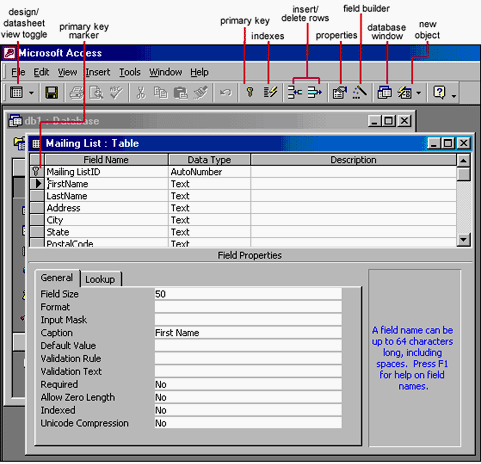
| Design View will allow you to define the
fields in the table before adding any data to the datasheet. The window
is divided into two parts: a top pane for entering the field name, data
type, and an option description of the field, and a bottom pane for
specifying field properties |
| Â |
|
| Â |
| Steps: |
| 1. Select 'Tables' tab From the Database view, click 'New' and
then choose 'Design View' from the 'New Table' dialog box, and click OK. |
| Â |
| 2. Enter a field name in the first row of the Field Name Column. |
| Â |
| 3. Press Enter or Tab to move to the Data Type Field. |
| Â |
| 4. Enter a data type for this field. Access will scroll
using the first letter of the data type, or you can also use
the drop down list provided to you. |
| Â |
| 5. Alter the Field Properties section of the table design grid as needed. |
| Â |
| 6. Add a comment in the description column for your better understanding |
| For the viewlet of Table in Design View. Click Here! |
| Â |
| Using Table Wizard |
| Like all Wizards, the Table Wizard simplifies the
Layout of the fields. You are guided visually through a series
of steps, which help you to decide on the type to be created, and
then the table is created automatically. The steps in creating a
table through 'Table Wizard' are as follows: |
| Â |
| 1. Open the 'New Table' Dialog box by using one of the followings: |
| Select the 'Tables' option from the Insert menu.
Select the 'Tables' tab and then click on 'New' button in the Database window.
Select the 'New' Object toolbar button and choose the Table option. |
| Â |
| 2. Select table type from the 'New Table' Dialog box. |
| Â |
| 3. Select table and field from the list of sample tables and sample fields. |
| Â |
| 4. Give title of the table and create relationship if exist. |
| Â |
| Â |
| Datasheet View to Make a Table |
| 1. Launch MS Access and start a new blank database. Access now
launches a blank table for use. |
| Â |
| 2. Enter data for the first field in the first row. |
| Â |
| 3. Right click on the first column header (labeled Field 1) and
choose Rename from the shortcut menu. This allows you to change the
column header, change it to Employee ID for this field. |
| Â |
| 4. Enter come name data for each of the next three
fields, editing the field names to Last Name, First Name, and
Middle Name respectively. |
| Â |
| 5. Move to the next column, Enter yes. |
| Â |
| 6. Move to the next column to enter date. |
| Â |
| 7. Click on the Save icon in the toolbar. |
| Â |
| 8. Click the view button to switch to Design View. |
| For viewlet of Using Table Wiard, Click Here! |
| Â |
| Â |
| Â |
|
| Â |
| Â |