| Introduction to LAMP & PHP |
| |
| Getting Your Environment Ready |
| |
| PHP and MySQL are usually associated with LAMP (Linux, Apache, MySQL, PHP). However, most PHP developer ( including me ) are actually using Windows when developing the PHP application. So this page will only cover the WAMP ( Windows, Apache, MySQL, PHP ). You will learn how to install Apache, PHP, and MySQL under Windows platform. |
| |
| The first step is to download the packages : |
| |
. Apache : http://httpd.apache.org/
. PHP : http://www.php.net/
. MySQL :www.mysql.com |
| |
| You should get the latest version of each packages. As for the example in this tutorial i'm using Apache 2.0.63 (apache_2.0.63-win32-x86-no_ssl.msi ), PHP 5.2.5 (php-5.2.5-Win32.zip) and MySQL 5.0. |
| |
| Now let's start the installation process one by one: |
| |
. Installing Apache
. Installing PHP
. Modifying Apache Configuration
. Installing MySQL
. Modifying PHP Configuration File |
| |
| 1. Installing and Configuring on Windows |
| |
| Installing Apache |
| |
| Installing apache is easy if you download the Microsoft Installer ( .msi ) package. |
| |
| 1. Just double click on the icon to run the installation wizard. |
| |
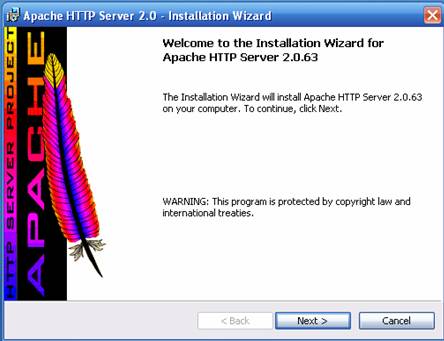 |
| |
| 2. Click next to continue installation. |
| |
| 3. Accept the license agreement and click on Next |
| |
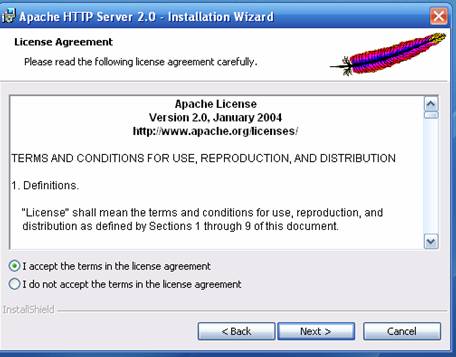 |
| |
| 4. Click next until you see the Server Information window. You can enter localhost for both the Network Domain and Server Name. As for the administrator's email address you can enter anything you want. |
| |
| If you are Windows XP(or any other NT based Windows OS) Install Apache as Service so every time you start Windows, Apache is automatically started. |
| |
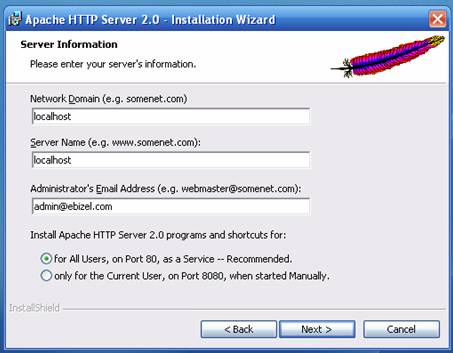 |
| |
| 5. Click the Next button and choose Typical installation.
Click Next one more time and choose where you want to install Apache ( I installed it in the default location C:\Program Files\Apache Group ). Click the Next button and then the Install button to complete the installation process. |
| |
| To see if you Apache installation was successful open up you browser and type http://localhost in the address bar. |
| |
| You should see something like this : |
| |
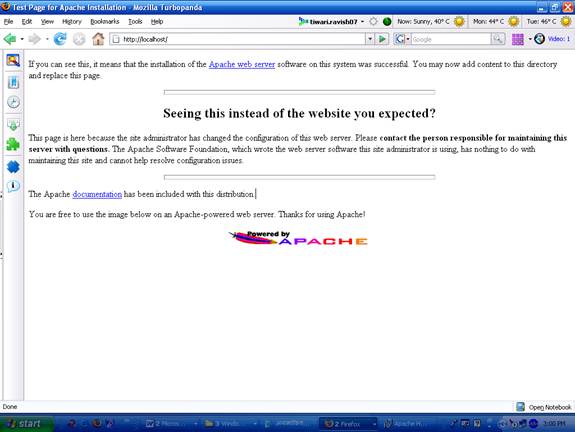 |
| |
| By default Apache's document root is set to htdocs directory. The document root is where you must put all your PHP or HTML files so it will be process by Apache ( and can be seen through a web browser ). Of course you can change it to point to any directory you want. The configuration file for Apache is stored in C:\Program Files\Apache Group\Apache2\conf\httpd.conf ( assuming you installed Apache in C:\Program Files\Apache Group ) . |
| |
| It's just a plain text file so you can use Notepad to edit it.
For example, if you want to put all your PHP or HTML files in C:\www just find this line in the httpd.conf : |
| |
| DocumentRoot "C:/Program Files/Apache Group/Apache2/htdocs"
and change it to : |
| |
| DocumentRoot "C:/www"
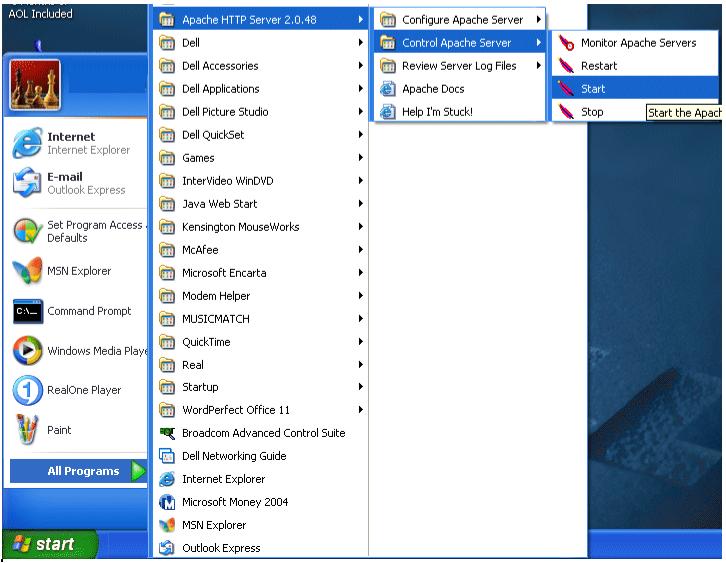
After making changes to the configuration file you have to restart Apache ( Start > Programs > Apache HTTP Server 2.0.50 > Control Apache Server > Restart ) to see the effect. |
| |
 |
| |
| Another configuration you may want to change is the directory index. This is the file that Apache will show when you request a directory.
As an example if you type http://education.ebizelindia.com without specifying any file the index.php file will be automatically shown. |
| |
| Suppose you want apache to use index.php, index.php or main.php as the directory index you can modify the DirectoryIndex value like this :
DirectoryIndex index.php index.php main.php Now whenever you request a directory such as http://localhost/ Apache will try to find the index.php file or if it's not found Apache will use index.php.
In case index.php is also not found then main.php will be used. |
| |
| Installing PHP |
| |
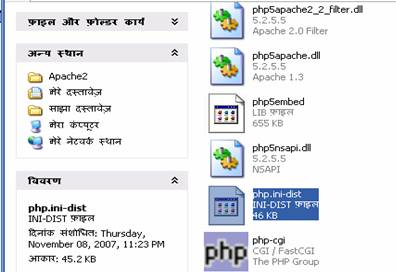
| First, extract the PHP package (php-5.2.5-Win32.zip ). I extracted the package in the C:\ drive. Change the new created directory name to php ( just to make it shorter ). Then copy the file php.ini-dist in PHP5 directory to you windows directory ( C:\Windows or C:\Winnt depends on where you installed Windows ) and rename the file to php.ini. directory to you windows directory ( C:\Windows or C:\Winnt depends on where you installed Windows ) and rename the file to php.ini. |
| |
 |
| |
| This is the PHP configuration file and we'll take a look what's in it later on. |
| |
| Next, move the php5ts.dll file from the newly created php directory into the Apache2\bin subdirectory. Quoting from php installation file you can also place php5ts.dll in other places such as : |
| |
. In the directory where apache.exe is start from ( C:\Program Files\Apache Group\Apache2 \bin)
. In your %SYSTEMROOT%\System32, %SYSTEMROOT%\system and %SYSTEMROOT% directory.
Note: %SYSTEMROOT%\System32 only applies to Windows NT/2000/XP)
. In your whole %PATH% |
| |
| Modifying Apache Configuration |
| |
| Apache doesn't know that you just install PHP. We need to tell Apache about PHP and where to find it. Open the Apache configuration file in C:\Program Files\Apache Group\Apache2\conf\httpd.conf and add the following three lines : |
| |
LoadModule php5_module "c:/php/php5apache2.dll"
#note the location may differ depending upon where you have installed PHP on your system.
AddType application/x-httpd-php .php
AddType application/x-httpd-php-source .phps |
| |
| The first line tells Apache where to load the dll required to execute PHP and the second line means that every file that ends with .php should be processed as a PHP file. |
| |
| You can actually change it to anything you want like .php or even .asp! The third line is added so that you can view your php file source code in the browser window. You will see what this mean when you browse this tutorial and click the link to the example's source code like this one. |
| |
| Now restart Apache for the changes to take effect ( Start > Programs > Apache HTTP Server 2.0 > Control Apache Server > Restart ) . |
| |
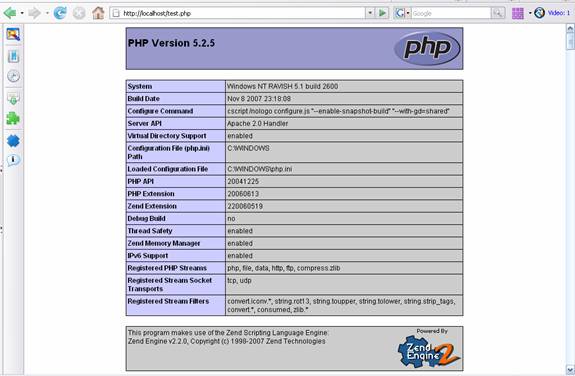
| To check if everything is okay create a new file, name it as test.php and put it in document root directory ( C:\Program Files\Apache Group\Apache2\htdocs ). |
| |
The content of this file is shown below:
<?php
phpinfo();
?> |
| |
| phpinfo() is the infamous PHP function which will spit out all kinds of stuff about PHP and your server configuration. Type http://localhost/test.php on your browser's address bar and if everything works well you should see something like this : |
| |
 |
| |
| Installing MySQL |
| |
| For Detailed installation guide of MySQL please refer to our MySQL tutorial, which contains installation as well as configuration instruction for MySQL. |
| |
| Modifying PHP Configuration File ( php.ini ) |
| |
| PHP stores all kinds of configuration in a file called php.ini. You can find this file in the directory where you installed PHP. Sometimes you will need to modify this file for example to use a PHP extension. I won't explain each and every configuration available just the ones that often need modification or special attention. |
| |
| Some of the configurations are : |
| |
1. register_globals
2. error_reporting and display_errors
3. extension and extension_path
4. session.save_path
5. max_execution_time |
| |
| register_globals |
| |
| Before PHP 4.2.0 the default value for this configuration is On and after 4.2.0 the default value is Off. The reason for this change is because it is so easy to write insecure code with this value on. So make sure that this value is Off in php.ini. |
| |
| error_reporting and display_errors |
| |
| Set the value to error_reporting = E_ALL during development but after production set the value to error_reporting = E_NONE .
The reason to use E_ALL during development is so you can catch most of the nasty bugs in your code. PHP will complain just about any errors you make and spit out all kinds of warning ( for example if you're trying to use an uninitialized variable ). |
| |
| However, after production you should change the value to E_NONE so PHP will keep quiet even if there's an error in your code. This way the user won't have to see all kinds of PHP error message when running the script. |
| |
| One important thing to note is that you will also need to set the value of display_erros to On. Even if you set error_reporting = E_ALL you will not get any error message ( no matter how buggy our script is ) unless display_errors is set to On. |
| |
| extension and extension_path |
| |
| PHP4 comes with about 51 extensions such as GD library ( for graphics creation and manipulation ), CURL, PostgreSQL support etc. These extensions are not turned on automatically. If you need to use the extension, first you need to specify the location of the extensions and then uncomment the extension you want. |
| |
| The value of extension_path must be set to the directory where the extension is installed which is PHP_INSTALL_DIR/ext, with PHP_INSTALL_DIR is the directory where you install PHP.
For example I installed PHP in C:\php so the extensions path is : |
| |
| extension_path = "C:/php/ext/" |
| |
| Don't forget to add that last slash or it won't work
After specifying the extension_path you will need to uncomment the extension you want to use. In php.ini a comment is started using a semicolon (;). As an example if you want to use GD library then you must remove the semicolon at the beginning of ;extension=php_gd2.dll to extension=php_gd2.dll |
| |
| session.save_path |
| |
| This configuration tells PHP where to save the session data. You will need to set this value to an existing directory or you will not be able to use session. In Windows you can set this value as: |
| |
| session.save_path = c:/windows/temp/ |
| |
| max_execution_time |
| |
| The default value for max_execution_time is 30 ( seconds ). But for some scripts 30 seconds is just not enough to complete it's task. For example a database backup script may need more time to save a huge database.
If you think your script will need extra time to finish the job you can set this to a higher value. |
| |
| For example to set the maximun script execution time to 15 minutes ( 900 seconds ) you can modify the configuration as max_execution_time = 900
PHP have a convenient function to modify PHP configuration in runtime, ini_set(). Setting PHP configuration using this function will not make the effect permanent. It last only until the script ends. |
| |
| |
|
| |
| |