| Site Navigation |
| |
| Sitemap in Asp.Net |
| |
| To use site navigation in ASP.NET, the structural explanation of the site must be needed so that the site navigation API and the site navigation controls can expose the site structure properly. The site navigation system uses an XML file by default, which contains the site hierarchy. It is possible to configure the site navigation system to use different data sources. |
| |
| Structure of Web.sitemap File |
| |
| The easiest way to create a site map is to create an XML file named Web.sitemap that manages the pages in the site hierarchically. This site map is automatically picked up by the default site-map provider for ASP.NET. |
| |
| An example showing a simple site map that goes four levels deep is given below. The url attribute can start with the "~/" shortcut which indicates the application root. |
| |
<siteMap>
<siteMapNode title="Home" description="Home" url="~/default.aspx">
<siteMapNode title="Food Products" description="Our Food products"
url="~/ FoodProducts.aspx">
<siteMapNode title="Fruits? description=" Fruits choices"
url="~/ Fruits.aspx" >
<siteMapNode title="Apples? description=" Apples choices"
url="~/ Apples.aspx" />
<siteMapNode title="Banana? description=" Banana choices"
url="~/ Banana.aspx" />
</siteMapNode>
<siteMapNode title="Vegetables" description="Software choices"
url="~/Software.aspx" >
<siteMapNode title="Potato? description=" Potato choices"
url="~/ Potato.aspx" />
<siteMapNode title="Tomato? description=" Tomato choices"
url="~/ Tomato.aspx" />
</siteMapNode>
</siteMapNode>
<siteMapNode title="Services" description="Services we offer"
url="~/Services.aspx">
<siteMapNode title="Payments? description=" Fruits choices"
url="~/ Fruits.aspx" >
<siteMapNode title="By Credit Card? description=" Credit Payment?
url="~/ Credit.aspx" />
<siteMapNode title="By Cash? description=" Cash Payment"
url="~/ Cash.aspx" />
</siteMapNode>
<siteMapNode title="Delivery" description="Software choices"
url="~/Software.aspx" >
<siteMapNode title="Self Delivery? description="Self Delivery"
url="~/ SelfDelivery.aspx" />
<siteMapNode title="Free Delivery? description=" Free Delivery"
url="~/ FreeDelivery.aspx" />
</siteMapNode>
</siteMapNode>
</siteMapNode>
</siteMap> |
| |
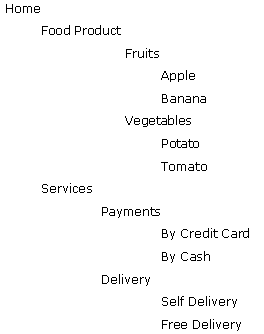
| The Sample Output of navigation structure is: |
| |
 |
| |
| In the Web.sitemap file, add a siteMapNode element for each page in your Web site. Then you can create the hierarchy by nesting siteMapNode elements. The title attribute defines the text that is usually used as link text, and the description attribute acts both as documentation and as a tool tip in the SiteMapPath control. |
| |
| Validity of Site Maps |
| |
| A site-map file said to be valid if it include only one siteMapNode element that is located immediately under the siteMap element. But the first-level siteMapNode element can include any number of child siteMapNode elements. Additionally, a valid sitemap file must not contain duplicate URLs, though the url attributes can be empty. Providers other than the default site-map provider for ASP.NET might not have this restriction. |
| |
| Multiple Site Maps Configuration |
| |
| It is possible to use more than one site-map file or provider to describe the navigation structure of a complete Web site. You can add references to different site maps in the Web.config file, essentially making them appear like different providers. This is beneficial when different areas of your Web site need different navigational structures. |
| |
| In your Web.config file, locate the
section. If it does not exist, use the following code. Otherwise, just insert the sections. |
| |
<configuration>
<!-- other configuration sections -->
<system.web>
<!-- other configuration sections -->
<siteMap defaultProvider="XmlSiteMapProvider">
<providers>
<add
name="A_CompanySiteMap"
type="System.Web.XmlSiteMapProvider"
siteMapFile="~/A_Company/A_Company.sitemap" />
<add
name="B_CompanySiteMap"
type="System.Web.XmlSiteMapProvider"
siteMapFile="~/B_Company/B_Company.sitemap" />
</providers>
</siteMap>
</system.web>
</configuration>
<siteMapNode siteMapFile="MySiteMap.sitemap"/> |
| |
| Assuming that the ~/A_Company/A_Company.sitemap and ~/B_Company/B_Company.sitemap files exist, you can now use them with the navigation API members and with navigation controls, such as SiteMapPath, TreeView, and Menu by setting the relevant SiteMapProvider property to A_CompanySiteMap or B_CompanySiteMap |
| |
| Site Maps Localization |
| |
| The location of the Web.sitemap file must the applicationâs root directory, still it can reference other site-map providers, or other site-map files in other directories as long as those files are in the same application. |
| |
| You can localize the properties in a site map such as title, description and also customize properties that are contained in the Attributes collection. |
| |
| In your site map, set the EnableLocalization property to true. For example, in code given above, change the
<siteMap> node to look like the following code: |
| |
| <siteMap enableLocalization="true"> |
| |
| For localizing the Url property, or to define different navigational structures based on a user's locale, you have to define different site-map files for each locale and programmatically switch to the appropriate Provider at run time. For more information |
| |
|
| |